TunnelGuard
macOS VPN Split-Tunnel Manager — Exclude specific domains from your VPN tunnel with a clean, native macOS interface.
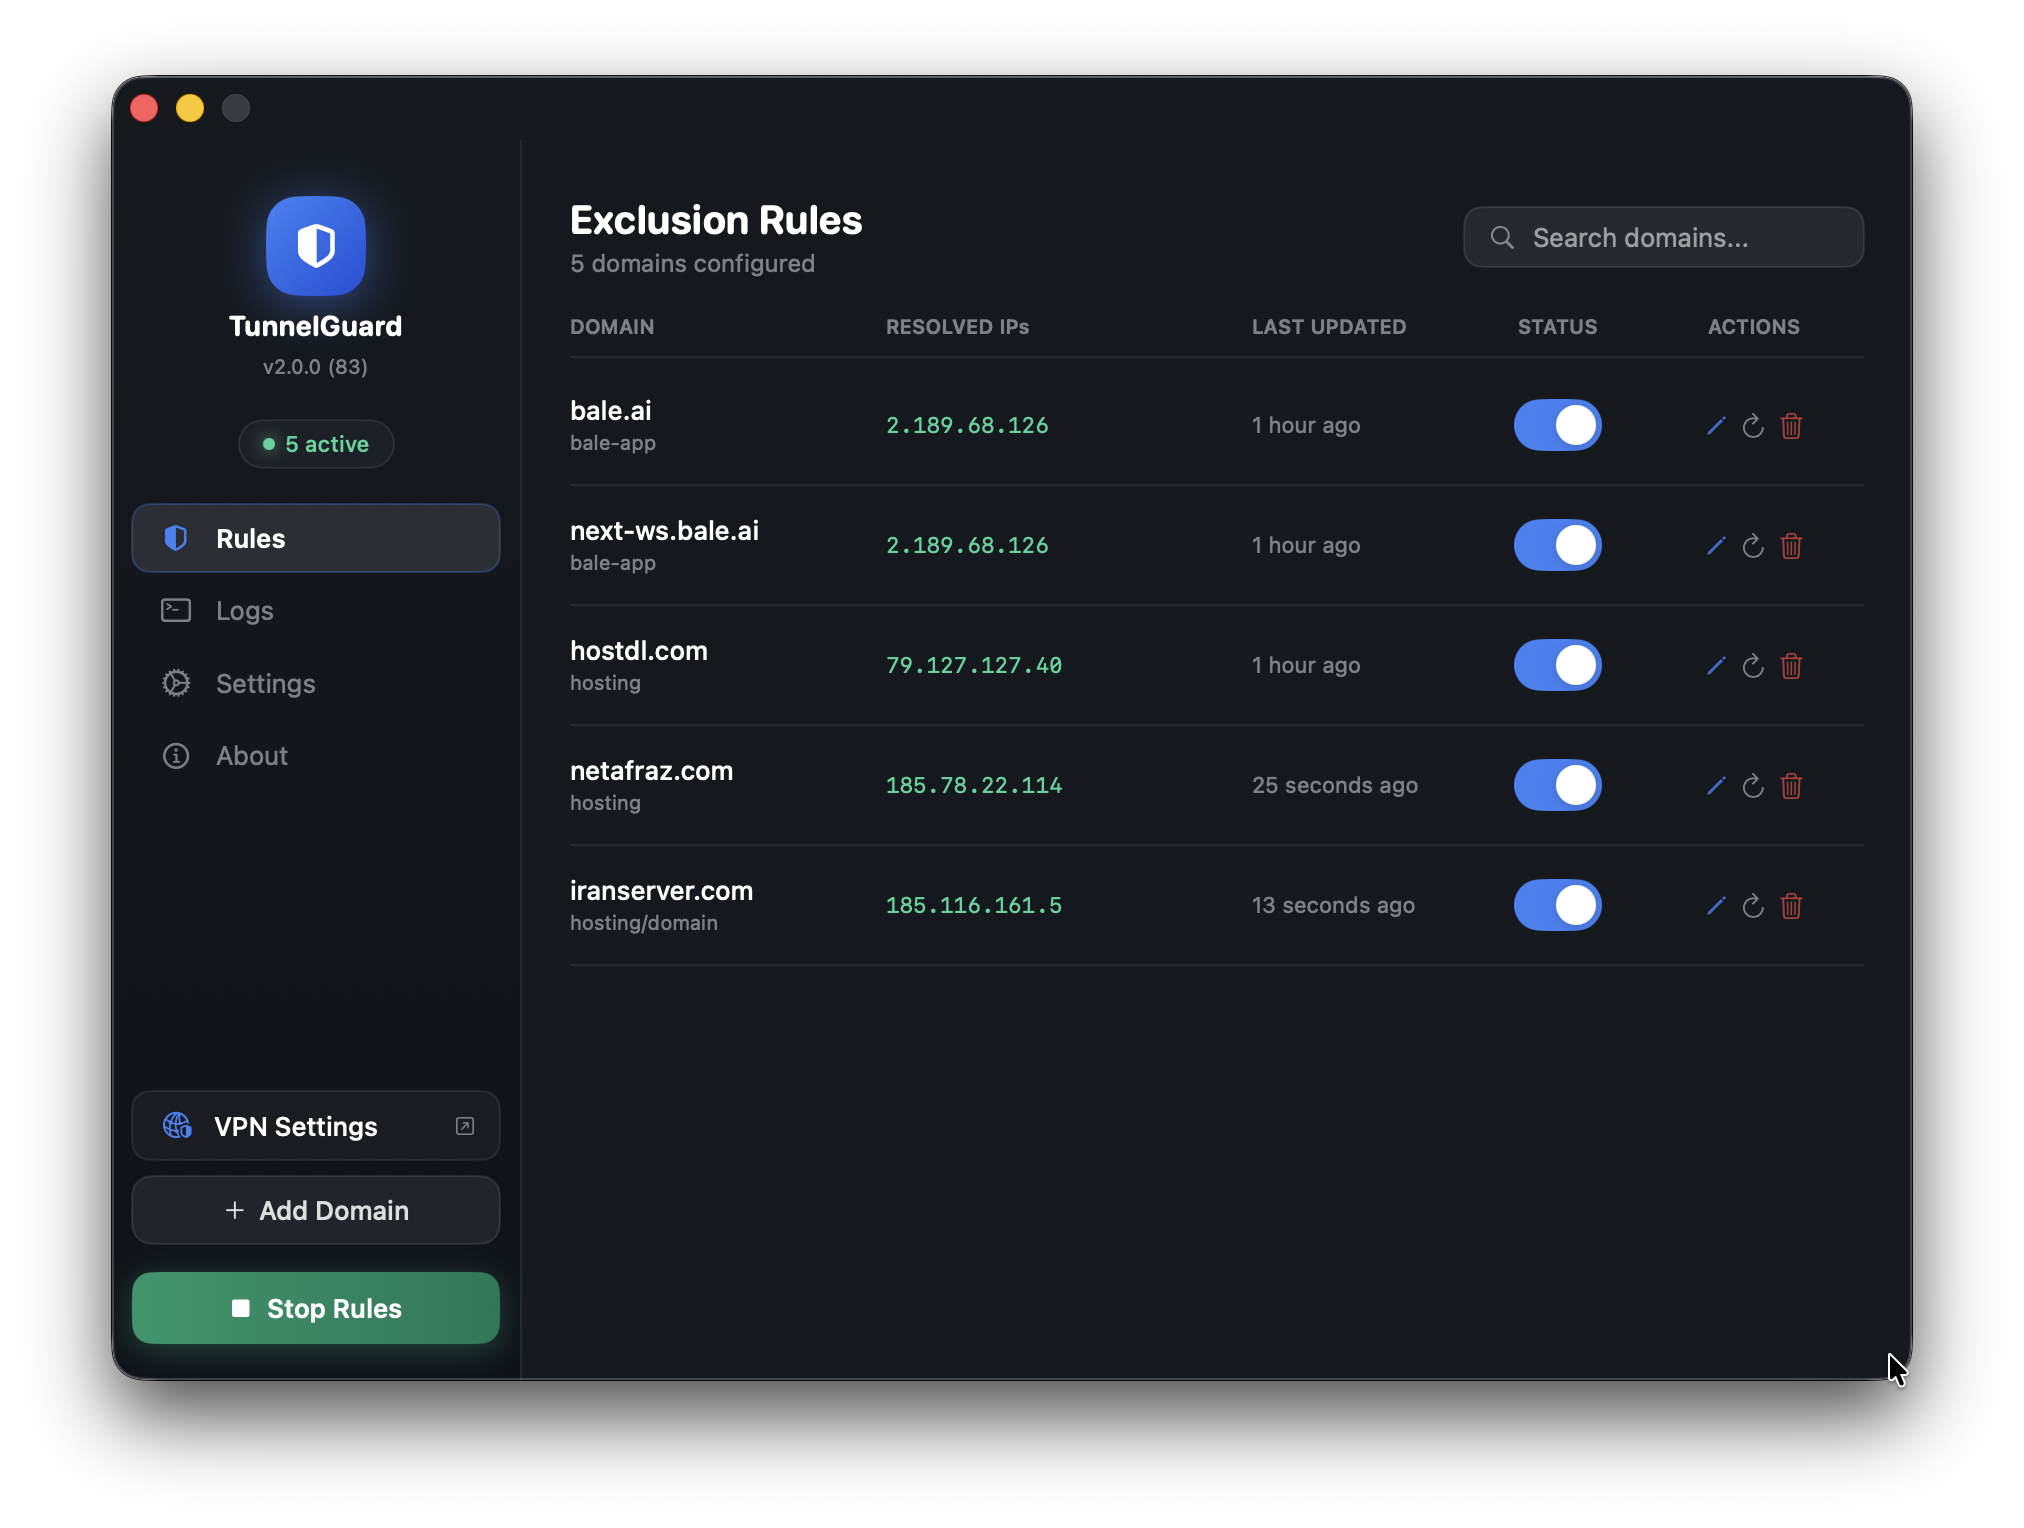
![]()
Version 2.7.0 (Build 147) · Released 2026-03-26
Developer: Amirhossein Hosseinpour (AmirhpCom) · GitHub
Inspired by: a post on dev.to by @vavilov2212
Download & Install
Step 1: Download
Or go to Releases to see all versions.
Step 2: Install from DMG
- Open the downloaded
TunnelGuard.dmgfile - Drag the TunnelGuard icon into the Applications folder shortcut shown in the window
- Eject the DMG from Finder sidebar (optional)
- Open TunnelGuard from your Applications folder
- First launch: macOS will warn it’s from an unidentified developer — right-click the app > Open > click Open again to bypass Gatekeeper
- Grant admin access: Go to Settings > Admin Access > Grant Access for passwordless route commands (recommended)
Tip: If macOS blocks the app entirely, go to System Settings > Privacy & Security and click Open Anyway next to the TunnelGuard warning.
What is TunnelGuard?
When you connect to a VPN, all your traffic is routed through it — including traffic to services that work fine without it (or break because of it). TunnelGuard gives you fine-grained control over your VPN routing by letting you specify domains whose traffic should bypass the VPN and use your regular internet connection instead.
This is commonly called split tunneling. macOS doesn’t expose this natively in its VPN UI, but the underlying route command makes it possible. TunnelGuard automates it with a beautiful, persistent interface.
Features
Core
- Domain-based exclusions — Enter a domain and TunnelGuard resolves its IPs and adds bypass routes
- Auto IP Resolution — Uses
dig/nslookupto discover all IPs (supports multiple IPs per domain) - Manual IP entry — Add custom IPs alongside auto-resolved ones
- Gateway auto-detection — Detects your local default gateway with IP validation, or manual override
- Start/Stop Whitelisting — One-click to apply all rules, one-click to stop
- DNS Bypass — Write resolved IPs to
/etc/hoststo bypass VPN DNS completely - Network change detection — Auto re-detects gateway and re-applies rules on network changes
Management
- Toggle rules on/off — Pause a rule without deleting it
- Edit rules inline — Change domain, notes, manual IPs with auto re-resolution
- Refresh IPs — Re-resolve a domain’s IPs at any time
- Duplicate rules — Clone existing rules with one click
- Import / Export — Save and load rules as JSON for backup or sharing
- Search, filter & sort — Find rules by domain/IP, filter by status, sort by name/date/IPs
- Delete confirmation — No accidental deletions
Security
- Input sanitization — All shell inputs validated (IPs, domains, DNS server, paths)
- Hardened Runtime — macOS Hardened Runtime enabled
- Restricted sudoers — Admin access limited to specific commands and paths only
- Secure temp files — UUID-based filenames prevent TOCTOU attacks
- Hosts file backup — Automatic backup before every
/etc/hostsmodification
Interface
- Keyboard shortcuts —
Cmd+N(new rule),Cmd+Shift+R(apply/stop),Cmd+1/2/3(tabs) - Toast notifications — Visual feedback for all operations
- Activity log — Real-time log with color-coded output + persistent log file
- Menu bar integration — Lives in your menu bar with dynamic icon
- Dark & Light theme — Follows macOS appearance
- Launch at startup — Runs as a LaunchAgent with auto-apply
- Single instance — Only one copy runs at a time
How It Works
TunnelGuard uses macOS’s built-in route command to add explicit routing entries:
# When you add a domain:
# 1. Resolve domain IPs
dig +short example.com A

# 2. Add a route via your local gateway (bypassing VPN)
sudo route -n add <resolved-ip> <local-gateway>

# When you remove/disable a rule:
sudo route -n delete <ip>
This tells your Mac: “For traffic to this IP, use the local gateway — not the VPN.”
Important: These routes are session-based. They reset on reboot unless TunnelGuard is set to launch at startup and apply rules on launch (both enabled by default).
Requirements
- macOS 13.0 Ventura or later
- Admin privileges (for
sudo routecommands) - Xcode 15.0+ / Swift 5.9+ (only if building from source)
Usage Guide
Adding Your First Rule
- Launch TunnelGuard
- Click “Add Domain” in the sidebar (or press
Cmd+N) - Enter the domain (e.g.,
office.company.com) — URLs are auto-cleaned - Optionally add manual IPs and a note
- Click “Add Rule” — TunnelGuard resolves the domain’s IPs
- Click “Start Whitelisting” (or press
Cmd+Shift+R) to activate all enabled rules
Gateway Configuration
By default, TunnelGuard detects your local gateway automatically. If the detected value isn’t a valid IP (e.g., link#28), you’ll see a warning with options to copy the value or switch to manual mode.
Go to Settings > VPN Gateway > Manual to enter your gateway IP manually (usually 192.168.x.1).
When your network changes (VPN connect/disconnect, Wi-Fi switch), the gateway is automatically re-detected and routes are re-applied.
DNS Configuration
By default, TunnelGuard uses 8.8.8.8 (Google DNS) for resolving domains. You can specify a custom DNS server in Settings > DNS Resolution, or click “Use Gateway” to use your gateway IP as the DNS server.
Import & Export
- Click the export icon (up arrow) in the Rules header to save all rules as a JSON file
- Click the import icon (down arrow) to load rules from a JSON file
- Duplicate domains are automatically skipped during import
Keyboard Shortcuts
| Shortcut | Action |
|---|---|
Cmd+N |
Add new rule |
Cmd+Shift+R |
Start / Stop Whitelisting |
Cmd+1 |
Switch to Rules tab |
Cmd+2 |
Switch to Logs tab |
Cmd+3 |
Switch to Settings tab |
Settings Reference
| Setting | Default | Description |
|---|---|---|
| Gateway Mode | Automatic | Auto-detect or manually specify local gateway |
| Manual Gateway IP | — | Used when mode is Manual |
| DNS Server | 8.8.8.8 | DNS server for resolving domain IPs |
| Write to /etc/hosts | Off | DNS bypass via local hosts file |
| Theme | System | Dark, Light, or follow system appearance |
| App Presence | Both | Menu Bar Only, Dock Only, or Both |
| Launch at startup | Off | Register as a system LaunchAgent |
| Apply rules on launch | On | Run active rules when app opens |
| Admin Access | Not granted | Passwordless sudo for route commands |
Building from Source
Prerequisites
xcode-select --install # Install Command Line Tools
Clone & Build
git clone https://github.com/amirhp-com/tunnelguard.git
cd tunnelguard/source
make build
Create DMG Installer
make dmg
# Output: dist/TunnelGuard.dmg
Open in Xcode
open TunnelGuard.xcodeproj
Build with Cmd+B or Product > Build.
Log Files
TunnelGuard writes logs to:
- In-app: Activity Log tab (200 most recent entries)
- Persistent:
~/Library/Logs/TunnelGuard/tunnelguard.log(auto-rotated at 1MB)
Contributing
See CONTRIBUTING.md for guidelines.
Areas That Could Use Help
- Subnet/CIDR support
- IPv6 support
- Multiple gateway profiles
- Automatic IP refresh on schedule
- Homebrew cask packaging
- Localization
- Accessibility (VoiceOver)
- Unit tests
Disclaimer
TunnelGuard modifies your system’s routing table using macOS native commands. This requires administrator privileges. Improper configuration may disrupt your network connectivity.
The developer assumes no responsibility for network disruptions, security incidents, data loss, or any consequences of using this software. This tool is intended for advanced users who understand network routing.
Never use this tool to bypass security controls you are required to comply with.
Changelog
See CHANGELOG.md for full version history.
License
Copyright (C) 2026 Amirhossein Hosseinpour (Amirhp.Com)

This program is free software: you can redistribute it and/or modify
it under the terms of the GNU General Public License as published by
the Free Software Foundation, either version 3 of the License, or
(at your option) any later version.
See LICENSE for the full text.
Acknowledgments
Built on macOS’s native routing infrastructure using route(8) and netstat(1).
TunnelGuard — Because your VPN shouldn’t be your whole network.